Physical Address
304 North Cardinal St.
Dorchester Center, MA 02124
Physical Address
304 North Cardinal St.
Dorchester Center, MA 02124

If you’re looking for a garden project to multiply your blooms on a budget, this is great! Dividing daffodil bulbs is a great way to use what you already have to create even greater impact in bulb garden. I recently took on this project and, like me, you may be wondering when to dig daffodil bulbs for best results. Is it even necessary? Is it worth it? And how do you divide daffodil bulbs without just destroying them?
Well, guess what? Digging and dividing daffodil bulbs is actually a lot less scary than it sounds – it was a breeze. We will cover all these questions and helpful tips in this post.

If you’re worried about digging them out a little too late, don’t be. That’s exactly what I did and they are doing just fine. In fact, there may even be some advantages to digging daffodils later than ideal. Read on and I’ll explain when to dig daffodil bulbs, how to divide them safely, and why winter digging worked for me.
The short answer is no – daffodils don’t actually need to be dug up and divided. In the wild, daffodil bulbs naturally multiply and spread over time without any help from us.
In the garden, however, we plant individual bulbs exactly where we want them. If grown in a suitable location, these bulbs will bloom year after year. Over time, each bulb produces shifts, similar to how a bulb of garlic splits. These young bulbs mature and flower in later seasons. Eventually, an original bulb can be multiplied into five, ten or even twenty bulbs. This process is called naturalization.

The result is a dense cluster of flowers in one spot, rather than daffodils spreading out over a larger area. While you will see more foliage and more flowers overall, the number of blooms per bulb may begin to decrease as all those bulbs compete for the same nutrients and space below ground.
If you are happy with the appearance of your daffodils, there is no urgent need to separate them. But if you’re seeing lots of leaves and fewer flowers, or if your clumps haven’t been touched in years, dividing them can make a big difference. Most gardeners find that dividing daffodils every three to five years helps keep them healthy and blooming at their best—and gives you more bulbs to plant elsewhere in the garden.
As with most garden tasks, timing is of the essence. The goal is to dig and divide the daffodils when the bulbs have stored as much energy as possible while minimizing stress on the plant.
You can really make any time of year work, but the ideal time is after the plants have finished flowering and the foliage has yellowed and died naturally. While the leaves are green, the plant is still photosynthesizing and storing energy in the bulb for next year’s blooms. Once the foliage begins to die, this energy storage process is complete.

Digging and dividing soon after shoot gives the bulbs everything they need to bounce back quickly once replanted, with minimal impact on future blooms.
If you dig up daffodil bulbs while the foliage is still green, it’s not the end of the world – but it can affect flowering the following spring. Digging too early interrupts the bulb’s energy storage process, meaning less energy is available for next year’s blooms.
How important this is depends on how much stress the bulb experiences. Root wear, desiccation and extended time out of the soil all play a role. Even so, most bulbs will survive just fine and often bounce back completely after a season.
If you wait too long, the plant may already be putting energy into the next growth cycle. Digging at this stage can disturb new roots or early growth, which adds stress at a time when the bulb is already active. Late digging can make sense if you are renovating, rebuilding garden beds, moving plants or moving and want to take beloved daffodils with you. Sometimes gardening is about priorities, not perfect timing. This was the case for us – I dug mine in the middle of winter.

Normally, this would not be recommended – but in my case, it made sense. We are in the middle of renovating our house, including rebuilding the retaining wall along our driveway. The daffodils were planted right across from it, and once that work started, saving the bulbs would be next to impossible. We planned to start work in early spring, which would be the worst possible time to dig them up.
Faced with the choice between digging them out by hand in the winter or losing them to heavy equipment in the spring, winter digging was the clear winner. They may not be blooming as brightly this year, but they are alive, saved and already settling into their new place.
One downside I noticed was just locating the bulbs. With no dead foliage to mark their place, I had to clear away the mulch and soil until I found tiny green tips. It would have been much easier to dig them earlier in the fall – but it was still totally doable.
The biggest challenge when digging daffodil bulbs is to avoid damaging them with your tools. Depending on your soil, you can use a garden fork or a spade. I have heavy clay soil, so a spade worked best for me – but it also meant I had to be extra careful not to cut slices off the bulbs. I did this a few times as you can see. It helps to remind yourself that the reason you’re doing this is because you’ve done it too many light bulbs – this will make you feel better.

Start by measuring the perimeter of the clump and digging several inches away from where you think the bulbs are. You want your shovel or fork to reach about six inches below the center of the block. Work around the entire group, loosening the soil before attempting to lift it in one piece.
Once your tool is completely underneath, gently rock and lift until the soil section is released. You’ll end up with a big clump of soil and bulbs like this:

Now it’s time to separate the bulbs! The large clump of daffodil bulbs will look like a dense, tangled mess. Over time, the bulbs produce displacements that are pressed tightly together, held in place by compacted soil and dried roots. When you pick up the block, it often comes out as a heavy, solid piece, with bulbs packed together like marbles stuck together by dirt – especially in clay soil.
The bulbs themselves are not fused. It is only the soil and the roots that hold everything together. The goal is to slowly relax this compressed mass.

Start by tapping or brushing loose soil so you can clearly see where one bulb ends and another begins. Gently shake and twist the outer bulbs, allowing the roots to gradually release naturally. Think less about pulling and more about releasing them, like loosening a knot instead of pulling on it. You can usually be a bit rougher than you think – I usually hold a bunch of bulbs on one side only and shake it around until it’s all loose. Once the first bulbs are loosened, the rest usually follow easily.

As you separate the bulbs, inspect them and keep only healthy ones. Healthy daffodil bulbs are firm and smooth. Bulbs with dents or exposed inner layers may have been damaged by animals and are less likely to flower. Slimy or mushy bulbs rot and should be discarded. Smaller bulbs may take a year or two to flower, but are still worth planting.
What you do next depends on your schedule and choices.
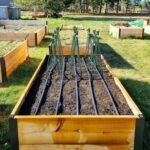
Replanting immediately is always best. Returning the bulbs to the ground quickly minimizes stress and helps them establish. Plant each bulb individually, spacing them about 4-6 inches apart. These bulb digger accessories make it a breeze. Take a look at ours fall bulb planting guide for more tips!

If immediate replanting is not possible, temporary storage may work. Store bulbs in a cool, dry, well-ventilated area and avoid plastic bags or damp conditions, which can encourage rot. Since I dug mine up in the winter, I replanted them fairly quickly, but took extra care to protect them from temperature fluctuations. I stored mine for a short time in cardboard boxes in my garage.
If you dig daffodils late, you may see fewer blooms the following spring — or possibly none at all. This does not mean that the bulbs have failed. It just means they are redirecting energy towards recovery.
Healthy foliage is a better indicator of future success than the number of blooms in the first season. In most cases, the bulbs fully recover within a year or two.
Water the newly planted bulbs well, improve the soil if needed and mulch to protect from extreme temperatures. Most importantly, be patient. Daffodils are tougher than they look.
Gardening doesn’t always happen on the perfect schedule. While time is of the essence, daffodils are extremely forgiving. If you have to dig them up and separate them—even later than ideal—it’s usually better to save them than leave them behind. If you’ve ever had to dig out light bulbs at the “wrong” moment, you’re definitely not alone. Looking for more bulb gardening ideas? Check out our list of beautiful autumn bulbs to consider planting or to learn how to push light bulbs indoors for early bloomers!