
Every spring, the situation worsened. Trays of destitute seedlings were piled on the kitchen table and every windowsill and counter was covered with baby plants, water stains and strays. potting soil. Trying to live among these temporary installations was difficult – a relentless cycle of rearranging, balancing, trying not to knock over pots and sacrificing comfort and space in the name of growth.
I desperately wanted a greenhouse so I could start my plants safely outside, but I was on a tight budget and didn’t have much space in my vegetable plot either. Traditional glass and metal-framed structures were expensive new, and buying a used one would involve paying big dollars for shipping as well as a complicated on-site rebuild. Cheaper plastic zippered options were too small or too flimsy for my needs.
I had almost given up on my greenhouse dream when I came across the DIY Geodesic Dome Kit from Build With Hubs. It is a UK based company but the kit is available from Amazon US. At just $195, it was by far the cheapest option I’d found, and the simple snap-together ball and socket connections seemed easy to use. I ordered the greenhouse kit, bought some wooden roof boards (just like the ones from Home Depot) from my local hardware store. It was time to build a greenhouse.


(Image: Ellie Tennant)
1. Site preparation
I started by leveling the ground where I wanted my greenhouse to be. This took longer than I expected because my veg plot is on a rather useless slope! I leveled the area as best I could using a shovel and rake, redistributing soil to create a reasonably flat base. In retrospect, I wish I had spent a little more time on this stage and done a better job of leveling – my greenhouse door still doesn’t open smoothly due to the uneven ground it rests on.
Once the space was ready, I started sawing some wooden roof boards to the right length. You can use any kind of stick you want with this kit – some hazel branches or traditional broom handles – but I chose ceiling sticks because they are affordable and already treated for outdoor use. By using sticks of different lengths, you can create domes of different diameters, and there is a handy online stick calculator tool on the Build With Hubs website which helps you cut your wood to the correct lengths. I wanted a 3m diameter greenhouse so I needed 30 ‘short’ lengths of 731mm and 35 ‘long’ lengths of 839mm.
Once the wood was cut to size, I used a Phillips screwdriver to attach the “ball” fittings to the ends of all the sticks.

(Image: Ellie Tennant)
2. Assembling the Dome
I built the dome following the kit’s instructions, starting at the “top” – five roof rods and a connecting hub – then adding the hubs and rods layer by layer until the dome shape was complete. This stage was surprisingly easy and quick, and it was rewarding to see the shape emerge so quickly. I was worried that my limited DIY skills would hold me back, but the knots were easy to snap into place and my dome was finished in no time.

(Image: Ellie Tennant)
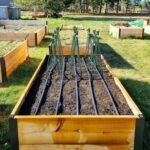
3. Construction of the Base
I made a basic base using 10 cylindrical fence posts (such as those from American Timber and Steel), which I hammered into the ground in a circle, using the canopy as a guide to place them.
I then recruited a group of kind and patient friends to help me lift the canopy up onto the fence posts and hold it in place while I turned the structure, screwing the hubs to the tops of the posts.

(Image: Ellie Tennant)
4. Fastening the windows to the frame
I used clear UV-resistant greenhouse plastic sheeting for the glazing – the kind farmers use when making agricultural polytunnels (just like this sheet from walmart). I cut the panels to size using scissors, then used a staple gun and a million staples to attach the edges tightly to the inside of the canopy. This took a long time, but a steady supply of cookies and coffee kept my spirits up, and it was satisfying to see the edge of the greenhouse closer to completion with each glass I installed.

(Image: Ellie Tennant)
Once all the panes were filled in, I cut to size and stapled on a temporary plastic zippered door – like decorators use to protect rooms from dust or paint. Finally, it’s time to grow up! I dug over the ground with some well-rotted manure and moved all my tomato plants into ‘The Dome’.

(Image: Ellie Tennant)
5. Adding the finishing touches
In the summer I made some small changes. I added a simple hinged roof vent to let heat escape on hot days and replaced the zippered door with a homemade hinged one for a sturdier entry. But otherwise, my DIY greenhouse has done so well. My tomatoes loved the warmth and cut really well.
I have been impressed with how sturdy the structure is overall. It has survived strong winds and storms – its shape has amazing built-in strength and remains stable when other nearby polytunnels and glass greenhouses have been damaged by wild weather.

(Image: Ellie Tennant)
In addition to being a place to grow plants, my greenhouse has become a sanctuary. I put an old folding chair there, so I could protect myself from the rain. Then I added fairies, another chair and a camping stove – and before I knew it, The Dome had become much more than just a place to grow plants. It’s now a year-round destination: a place to call my folks, somewhere to meet friends for a sunset chat, make pancakes for my kids, or just sneak off and relax in nature.
Occasionally, I treat myself to breakfast at The Dome, cooking a freshly hatched egg on the camp stove. This was the best $200 I have ever spent.

(Image: Ellie Tennant)