
Berries may be my absolute favorite addition to my garden and I think everyone should pick at least one to include in their garden kitchen garden. Nothing says summer like a big bowl of fresh berries on the counter next to your home grown cut flowers! If you have raspberries or are considering adding them to your home garden, supporting them is a key consideration. These raspberry pergola ideas will give you some great options to choose from, and we look at the pros and cons of each to help you make a decision!

Ready to add raspberries to your garden? Let’s dive into them DIY trellis options to start on the right track!
Why You Should Use Trellis Raspberries
Raspberries are vigorous growers and spread easily. Without a trellis system, they can quickly turn into a tangled mess. And it’s not just the containment, but the trellis makes harvesting easier, reduces disease and keeps the patch tidy.
An ideal trellis arrangement will support your blueberry plants, keeping them upright and supported. In addition to support, proper maintenance and spacing along the trellis improves airflow, reducing disease. It will also make pruning and harvesting easier. As an added bonus, you’ll get a better berry crop when your plants aren’t competing with each other for space and sunlight! Less competition = better fruit quality!

In this post, we’ll cover 3 practical pergolas and support systems that you can build at home. We’ve included a selection that’s perfect for tight spaces, and dive into the details of how to maintain each option.
Raspberry Trellis Ideas
Before choosing a method, think about your priorities – harvest size, ease of harvest, keeping things tidy? All of these methods work great, but some are better for different reasons than others.
T-Post Trellis: Single File Wire System
Our first pick is great if you want an easy setup and a narrow blackberry patch for easy access to the berries. With this raspberry trellis, you’ll be planting raspberry canes one file at a time, and you need to keep things close enough to tie each cane to a single row of wires running from post to post. West Coast Gardener he has a great tutorial on how to set up and maintain his. Metal T-posts make this a super quick DIY project, but you can always use wood posts if you prefer the look of metal posts.

- How it works: Metal T-posts are spaced every 5-10 feet with one or two levels of wire hinged horizontally between the posts at different heights.
- Advantages:
- Budget friendly
- Simple to install
- Flexible for row expansion
- Disadvantages:
- Requires some cane tying
- Can be messy mid-season if not maintained (you have to keep tying new rods)
T-Trellis Retaining System with Cross Bars (Option 2)
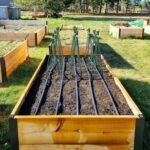
This is what I have in my new garden and I love it so far. The support system was built into its own raised garden bed approximately 48″ wide. I found that the strong canes grew quite thick and it can be difficult to reach (or see) berries in the middle of the row. I think pruning the second year canes a little more would help a lot.

However, wire borders help immensely in limiting new growth. As long as the first-year canes grow from close enough to the center of the row, they end up being supported by the border without any extra care. it was so low maintenance! Overall, I think this is a great choice if you are looking for a permanent pergola for your raspberries.
- How it works: sturdy support posts with wooden cross pieces form a “T” at the top of each post. Run 2 parallel wires at the top and middle on each side to create a walkway containing reeds (this photo from winter is a good close-up to see where the wires connect)

- Advantages:
- Holds rods in place without tying each one
- Neat appearance
- Harvest from both sides
- Disadvantages:
- It requires a bit more time and materials to build
- The inside of the row can get quite dense if not pruned enough (I think I’m probably missing a lot of raspberries just because I can’t see through the dense growth)
- Note: you can also set up a similar retaining system using posts in each corner and a pair along the border of the blueberry patch. This provides a place to run the wires in a similar fashion and creates a fence-like system around your raspberries – See Lovely Green’s Post to see what I mean.
The Tepee Trellis
For some reason, I can’t find any examples of people using this method, but I swear I’ve seen people use it before! I think you usually just have a pole in the ground with blackberry canes growing around it, and you tie them all to the pole forming a tepee.
- How it works: Several tall poles (such as bamboo or branches) are tied together at the top to form a cone shape
- Ideal for: Small garden beds or compact spaces
- Advantages:
- No permanent installation needed
- Ideal for container or raised bed gardeners
- Fun visual element
- Disadvantages:
- Limited capacity
- Not ideal for large harvests
- Canes still need gentle tying
Let me know if you’ve done this or know of an example online!
Use an existing hedge as a raspberry trellis
I like this method if you already have a fence in place or have a small space. It allows you to grow a nice, neat row of raspberries and add support wires if needed. However, if you want a huge blackberry patch, this may not be the best option because it requires you to keep the individual plants growing quite sparsely, tying each one to the fence.

- How it works: Blackberry canes are planted next to a chain-link or open-frame fence and tied loosely to keep them upright. Check out this post from Whitney and Eric to see how they set up their fence trellis! (photo above)
- Best for: Gardeners working with limited space or already growing near a fence
- Advantages:
- Saves time and materials
- It leverages the existing structure
- Disadvantages:
- It’s not a natural fit – raspberries don’t stick like vines
- Not a good choice if you can’t access both sides of the fence
Winner: T-Post Containment System
I hope these short notes help you decide which blueberry trellis idea is right for your garden! In our opinion, the T-Post holding system wins, but I would keep the plants pruned a little narrower than mine is. I have canes growing in a row about 48″ wide but ideally I would prune anything outside of a main cluster of canes about 36″ wide at most. Here are our quick notes on why this system wins in our book, but consider your own space and maintenance needs before you decide for yourself!
- It takes a little more effort to set up, but requires less maintenance
- Keeps plants tidy without much maintenance
- It makes harvesting quick and easy – no wading through a tangled jungle if you’re good at pruning the canes and don’t make the patch too wide.
- Scales well for serious gardeners

Some tips for growing raspberries successfully
- Prune old canes after fruiting to reduce clutter and promote next year’s growth
- Tie the canes loosely with garden twine or soft bales to prevent damage
- Mulch under your trellis to suppress weeds and conserve moisture
- Research the two main types of raspberries: summer-fruiting raspberries vs. fall-fruiting raspberries
- Learn about new primocanes vs. second year floricanes

Enjoy Raspberry Bounty in your garden!
Ready for fresh raspberries all season long? Start working on one of these blueberry pergolas, order some bare root blueberries and you’ll be good to go in no time! Raspberreis are such a fun and tasty addition to any garden and great if you want to add a few permaculture gardening in your life, so I hope this post helps you gain the confidence to tackle a project, discover the tools, and build your own trellis to add some delicious red raspberries to your harvest!
Craving more garden projects? Take a look at ours outdoor built in planter ideasthis stylish pergola ideaor these beautiful ones copper garden art ideas! I like the idea of it too making your own wind in the garden – such a fun project! Happy gardening!