

Do you find yourself parking your cars on the street because your garage is too full? Whether you want to spring clean your garage or are simply tired of its clutter, regular cleaning and organization is key to controlling this area of interest.
What follows is the method I’ve used for decades to clean ours out and keep garage storage from turning into piles of clutter and junk again. So if you’re ready to clean out your garage and be the envy of your neighbors, roll up your sleeves and follow these steps!
Subscribe to the newsletter
Get the quick absorption checklist
and I’ll send you free weekly cleaning tips.
Steps to spring cleaning your garage
Step 1: Gather your gear
Make sure you have everything you need by gathering it ahead of time. Once you start deep cleaning your garage, you don’t want to hit the store mid-project!
- Cleaning supplies: Microfiber cloths, all-purpose cleaner, soap and water, bucket, scrub brush and broom or shop case.
- Safety equipment: Work gloves (to protect against messy or toxic materials) and stools.
- Classification tools: Black permanent markers, tape and cardboard boxes labeled: Donate, Elsewhere, Trash and Dispose (for hazardous items such as old paint or motor oil).
- Organization Tools: Plastic storage bins, labels, hooks or pegs.
Pro tip: Plan wisely and pick a sunny day for this project, as you’ll need plenty of street space to arrange your items.
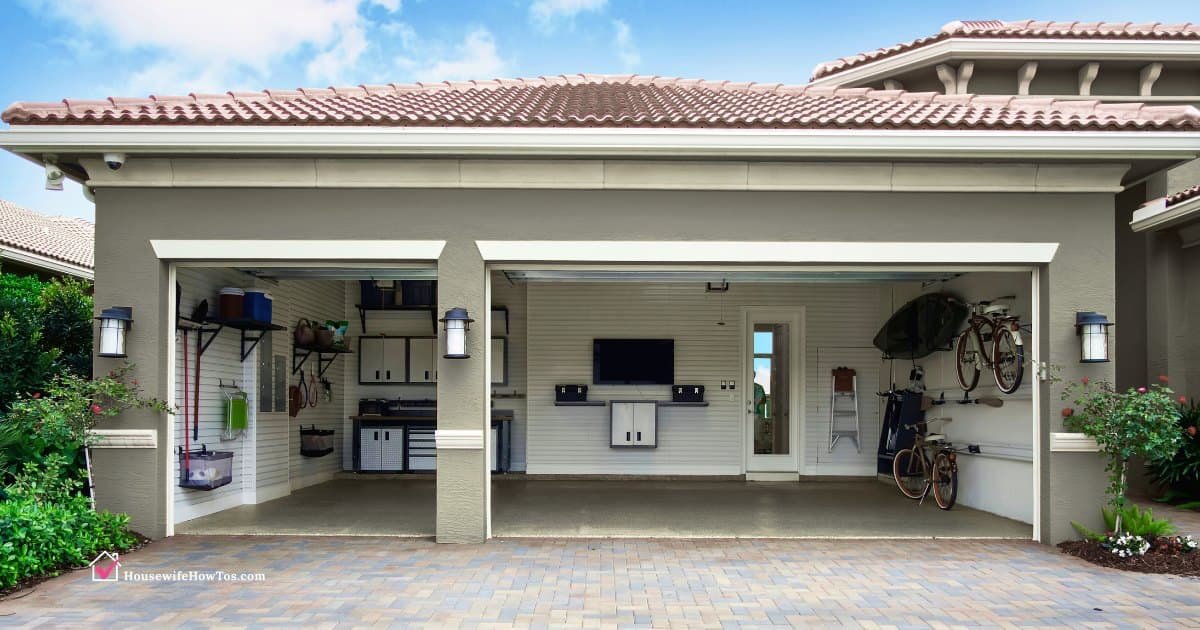
Step 2: Decide on storage zones
Before you start moving items out, spend some time thinking about how you use the space. Create separate “zones” that reflect how your family actually uses the garage.
This allows you to store your belongings by category, making it easier to find and put things away. Check out these helpful zones:
- Return home zone: A spot for shoes and umbrellas.
- Mass Storage Zone: For those warehouse purchases like pop pouches and large bags of cat litter.
- Outer Gear Belt: Sports equipment, bicycles, skateboards, outdoor toys, etc.
- Tool Belt: Rakes, shovels, pruning shears, power tools, etc.
- Easy Access Zone: One or two items you often need for that season, such as a garden hose or snow shovel.
- Decoration zone: Christmas decorations and seasonal items, sorted by occasion.
- Additional storage zone: Souvenirs, keepsakes, out-of-season clothing in containers.
- Recycling and garbage zone: Trash cans and recycling bins, along with spare bags.
Step 3: Remove everything and sort
The easiest way to deep clean and organize your garage is to pull everything in your way. If this is not possible, work on the garage one section at a time. As you clear the space, separate items into boxes with your labels.
As you take things out, separate them from the zone where you will place them in your clean garage. Throw away the clutter and set aside things to donate as you go. A good rule of thumb for decluttering: donate things in good condition that you haven’t needed in a few years or that you have duplicates. Throw away things that are broken, soiled or worn.
Step 4: Clean it from top to bottom
Cleaning out a garage is messy, but rewarding!
- Scan from top to bottom: Grab your broom start at the ceiling and corners, then move to the walls, shelves and finally the floor. Use a vacuum cleaner to remove dust in floor cracks or gaps at the base of walls. (You might want to consider caulking these as well to keep pests out.)
- The garage door: Close the door to wipe the interior, then open it to wipe the pieces and remove dirt.
- Clear details: Use a damp cloth to clean light fixtures, switches, door knobs, doorknobs, garage door openers, and even light bulbs (when they’re cool!).
- Clean up any floor stains: Use warm, soapy water and an exfoliating brush for oily spots. You can use a pressure washer on stubborn cement stains, but then you have to wait a day or more for the floor to dry completely before you can put things back inside to avoid mold.
Did you know? Avoid using WD-40 on your garage door tracks, as it can remove the necessary lubrication. Use a silicone-based lubricant instead.
Step 5: Organize your storage space and maximize vertical space
Now that the space is clean, it’s time to put things back in their designated zones. The key to long-lasting organization is to maximize vertical storage and keep items off the floor to protect them from moisture and pests.
- Use hooks and pegs: Hang hand tools and garden items on the walls. You can even draw outlines around tools on a peg so everyone knows where they belong.
- Install shelves or ceiling shelves: Heavy-duty roof racks are perfect for memorabilia or off-season gear.
- Use clear, waterproof bins: Clear bins allow you to see what’s inside without having to open everything up.
- Highlight all: Use your pointer to clearly mark the boxes. A great trick for extension cords is to store them in cardboard tubes with the length written on the outside to keep them untangled.
- Keep the floor clean: The less on your floor, the easier it is to keep your garage clean.
Step 6: Finish
Once everything is back in place, give the floor a final sweep to catch any residue that remains. Then drive to your local charity and city waste management facility to drop off your donations and hazardous waste. You may be tired, but coming home to a clean, organized and beautiful garage is the best reward!

Get the garage cleaning checklist
Get the 2-page checklist that contains all these steps and zones. Accessible from any device or print it out and cross out the steps as you go. Price: $3 USD
MORE Spring Cleaning Guides